
Anchor links are a helpful way for recipients to navigate or jump around to various sections within a long form email. Learn more about how to use anchor links in your message.
1. Build your email, including all the various headers, sections, images, and text. Then, decide how you want to apply your anchor links - you can add an anchor link to any text in your email or within the Menu content type in the Workshop editor.
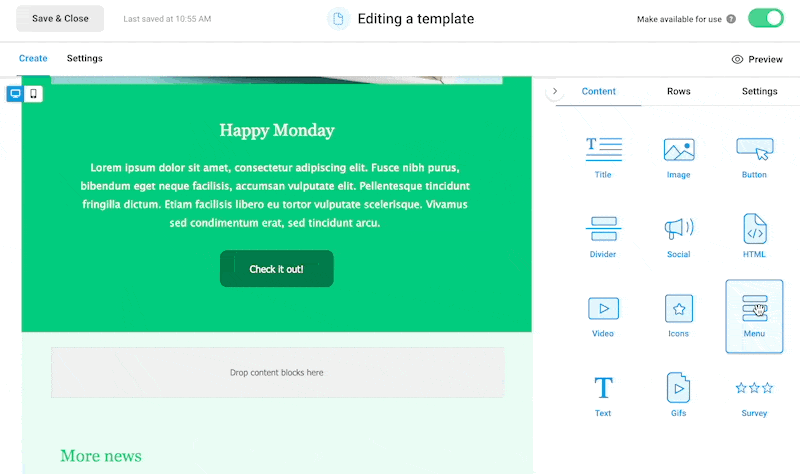
In this example, we're adding a traditional Menu for easy navigation. Drag the Menu content type to the desired area of your email, and select Add New Item. Add the names of your sections within the Text field. You'll eventually link these names to sections further down in your email.
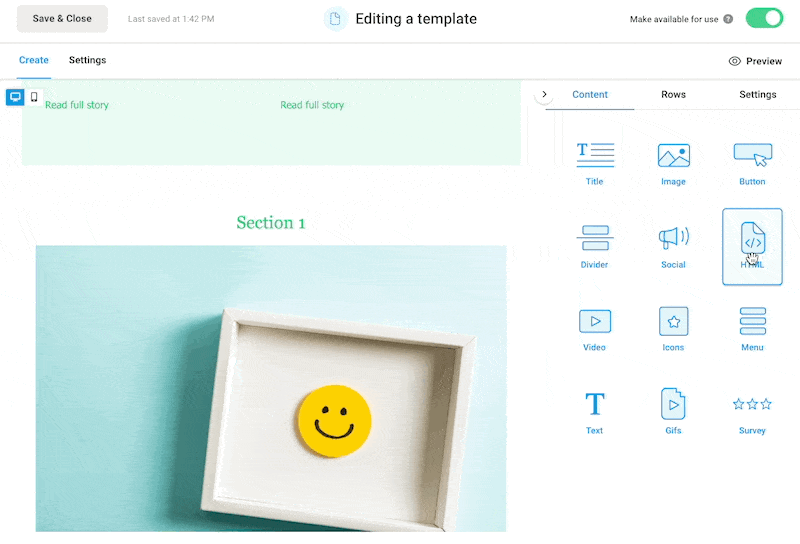
2. Choose your anchor link name and its position. For this step, we'll use the custom HTML content block in our editor to add the anchor - you can think of this anchor as similar to a bookmark!
Move to the section of the email that you want to link to, then drag and drop the HTML block where you want the email to "jump" to. In this example, it's right below "Section 1" in our email.
To create the anchor, delete all of the pre-existing code in the content properties of the field and paste in one line of HTML code below:
<a name=""></a><br />
From here, type in the text between the two quotations - you can type whatever you want, but we recommend keeping it simple and to one word. In this example, section1 has been added between the quotes, so the resulting code in the HTML block looks like this:
<a name="section1"></a><br />
3. Link your anchor: now that you've set the anchor's position, it's time to link the menu or text from the top of your email to it.
Navigate back to the top of the email (the menu in our example), and select the content. Within the Content Properties under Link type, type in the text from your HTML block within the URL field, and add a # in front of the text. In our example, the text we'll add looks like this: #section1
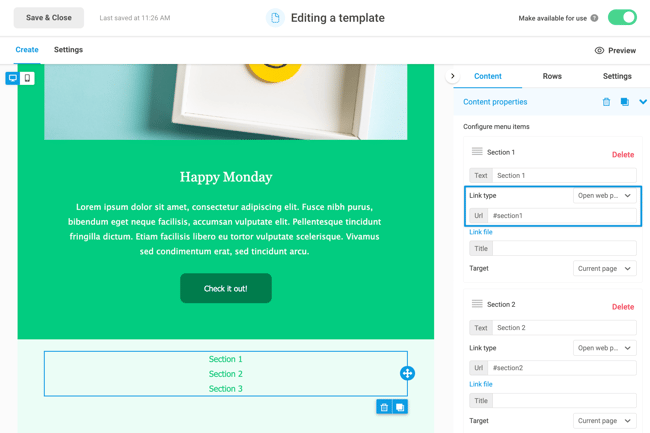
For the link to work, it's important to include the hashtag before the name to make sure the name matches the one you entered earlier.
At this stage, you've now created two parts of your anchor links - the anchor text and the link pointing to it! 🎉
Pro tip: if you want to add more anchor links in other sections of your email, simply duplicate the first HTML content block you built first, drag it to the new section you want to link to, and change the text within the HTML code to match the text of the menu/section at the top of your email.
Important notes
- To fully test your anchor links, be sure to send yourself a test email. Workshop's Preview features will not accurately display the anchor link functionality.
- Anchor links are not supported by all email clients, so keep this in mind when choosing to use them in your emails. Here's a list of the most popular email clients:
| Email client | Anchor links supported? |
|
Gmail (web) |
Yes |
| Gmail (Android app) | Yes |
| Inbox by Gmail (Android app) | Yes |
| Gmail (iOS app) | No |
| Apple Mail (iOS) | No |
| Yahoo! Mail (web) | Yes |
| Outlook.com (web) | Yes |
| Outlook (Android app) | No |
| Outlook (desktop) | Yes |
| Outlook for Mac | No |
| Samsung email app (Android) | Yes |
| Windows Mail (Windows 10) | Yes |