
Workshop is an internal communications email platform designed to streamline the way you connect and engage with your team. Within minutes, you can easily create, send, manage, and measure engaging email campaigns, newsletters, and announcements.
In this article, we will cover the following:
Navigation overview
When you are added as a new Workshop user and log into your account, you will first see your account dashboard. At the top of your dashboard you will will see a navigation bar with five options: DASHBOARD, CAMPAIGNS, EMAIL, PEOPLE and MANAGE.
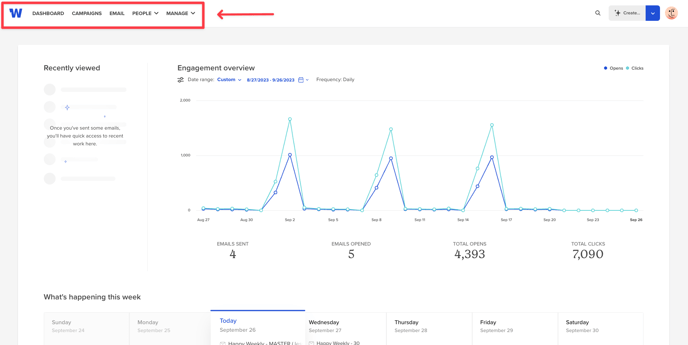
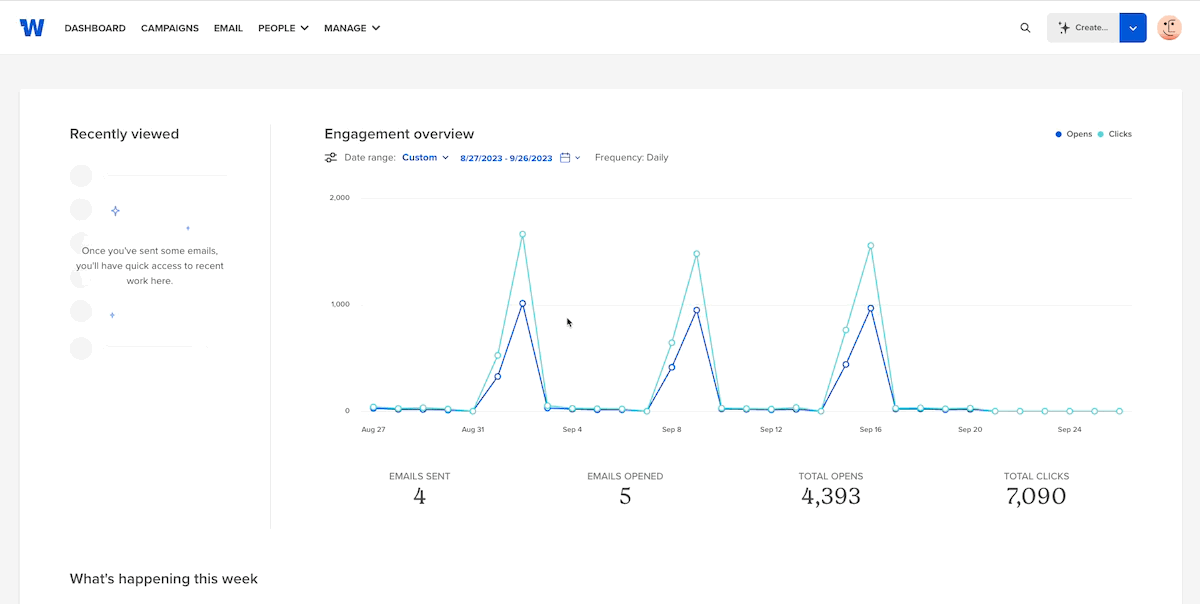
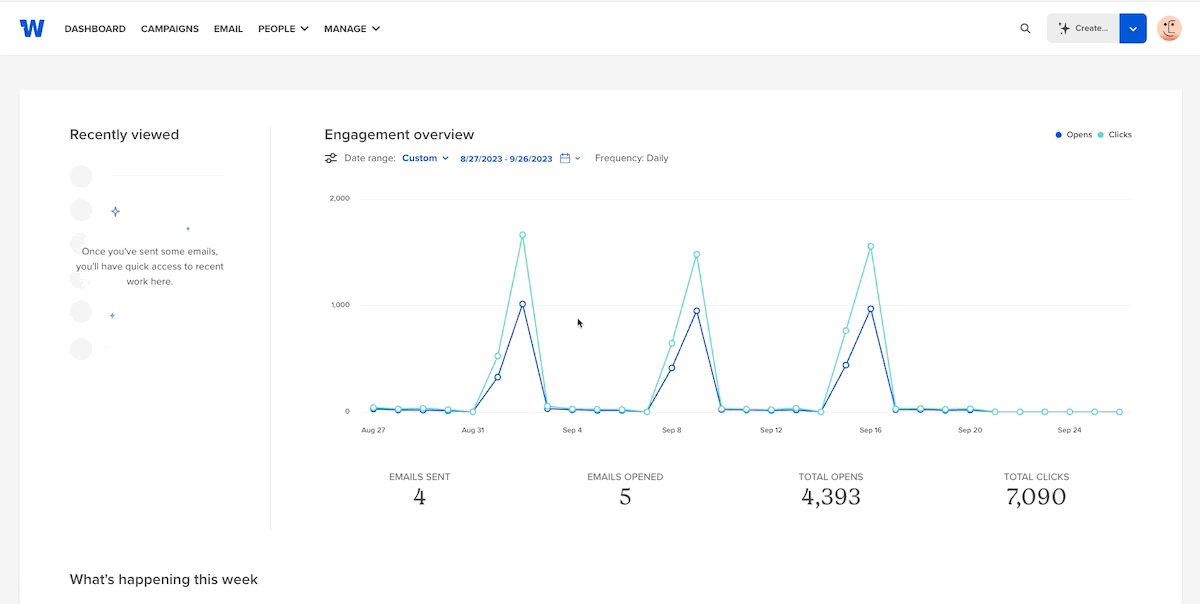
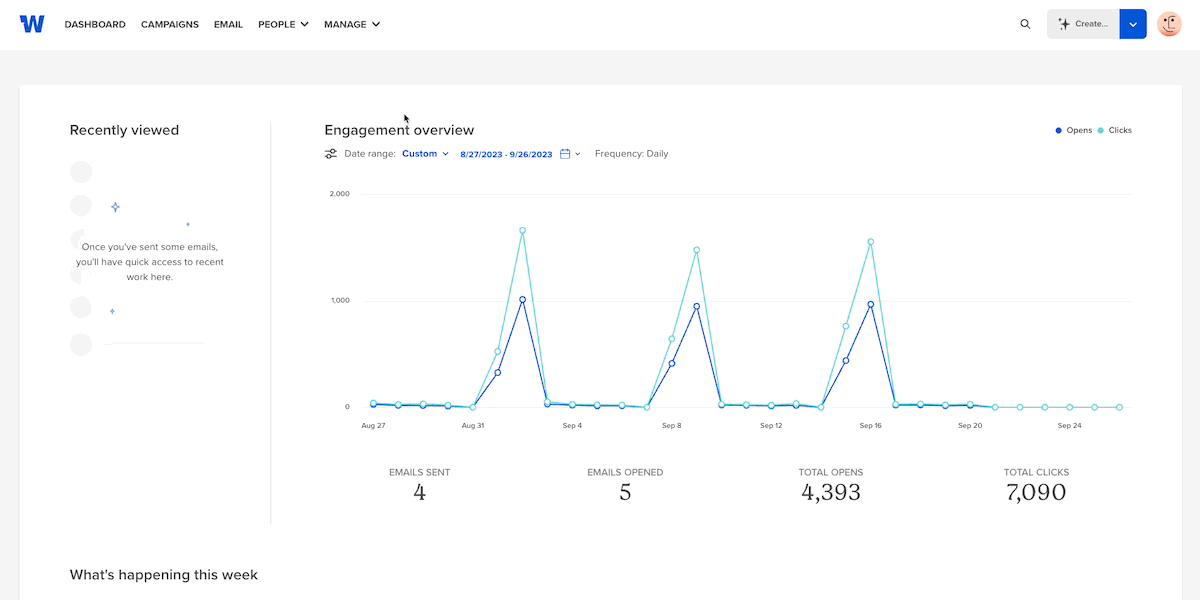
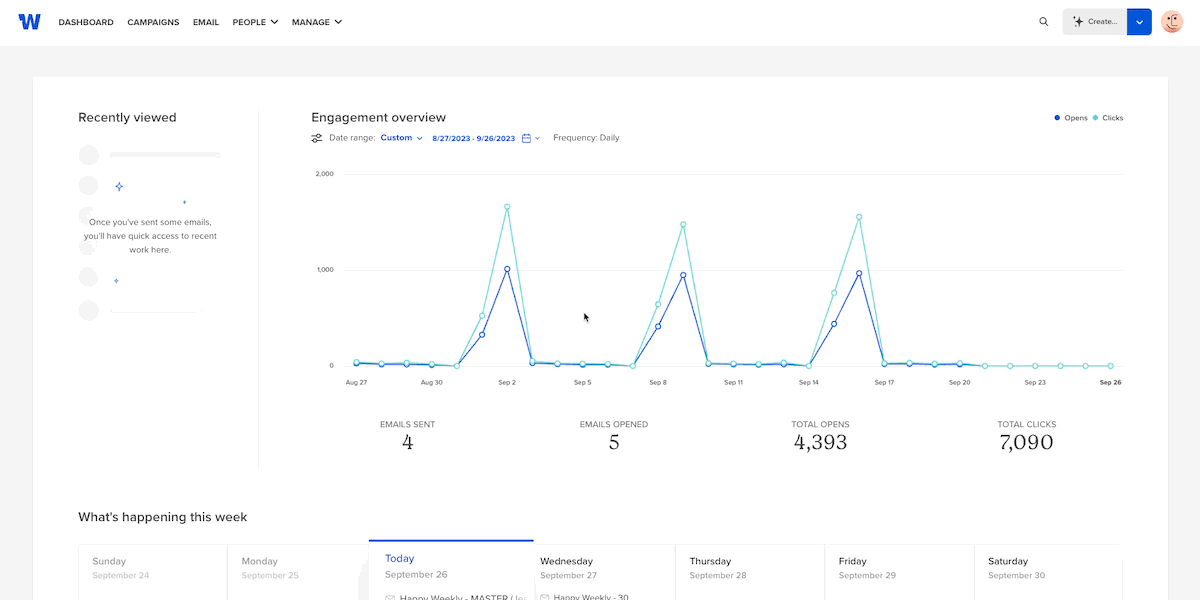
DASHBOARD: The DASHBOARD tab will show you recently viewed emails, an overview of engagement, and an upcoming email calendar.
CAMPAIGNS: The CAMPAIGNS tab will show you your Active, Ongoing, Completed, and Scheduled email campaigns. If you click into a particular campaign, you can view an overview of your campaign, the performance of the campaign over time, individual emails within your campaign, and a list of recipients. You can also filter campaign performance by departments, teams and more.
EMAIL: The EMAIL tab will display all of your Draft, Scheduled, and Sent emails.
To continue working on a current draft, find the email you would like to edit from the email tab and click into it. From here, you can edit your current content, add additional content blocks, send test emails, and more.

To review the email analytics of a particular email, find the sent email you would like to review from the EMAIL tab and click into it. From here, you can view the email’s performance including an engagement overview, time read, an engagement timeline, devices, web visits, and clicks!
PEOPLE: The PEOPLE tab is where you will manage your directory and distribution lists.
MANAGE: The MANAGE tab is where you will manage your templates, apps/integrations, and users (including groups).
How to create an email
To create and send an email from Workshop, navigate to the EMAIL tab and select Create email in the upper right-hand corner. From there, you can choose to create an email from one of your templates, a template that has been shared with you, one of the community templates, or, start from scratch!
- My templates: These templates are emails you have created and saved.
- Shared with me: These templates are emails that your team has created and shared with you. (To learn more about Workshop's sharing and privacy settings, check out this video!)
- Community: This is a pre-designed email template library. You can clone and modify any email in the Community template library.
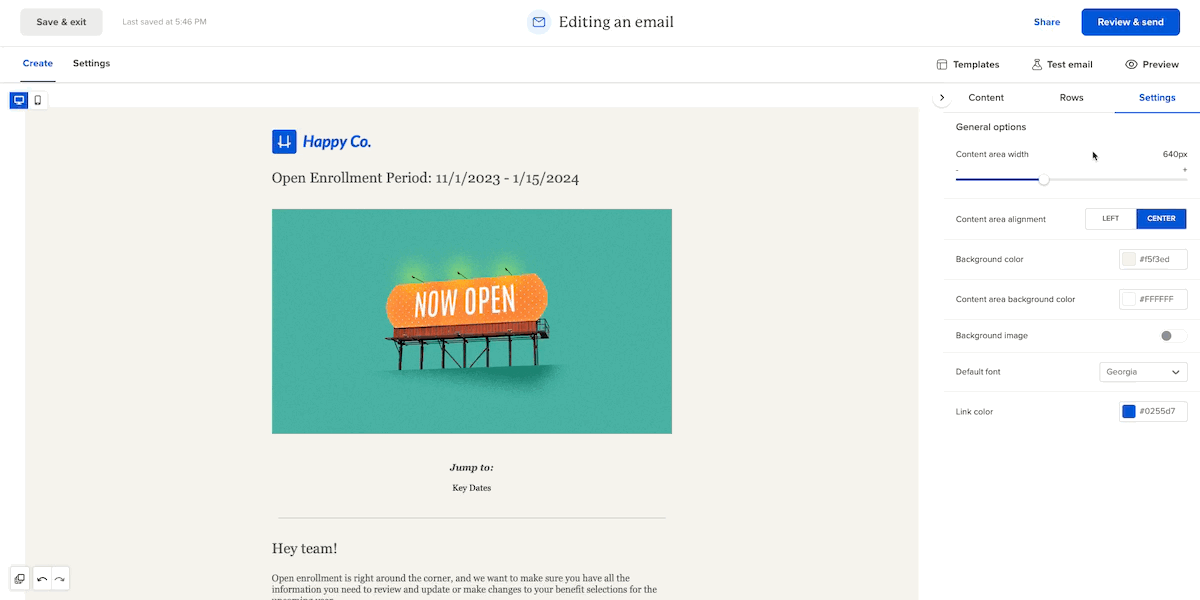
Once you have selected a template, or started from scratch, you will see the email editor. This is where you will add all of your content to your email. On the right-hand side of the email editor you will see options for Content, Rows, and Settings.

Settings: The Settings section within the email editor allow to adjust certain settings for the entire email. For example - setting the default font to Arial will ensure that all text boxes will apply the Arial font.
These include:
- Content area width: Adjust the content area width for the entire email
- Content area alignment: Choose if you would like your email content aligned to the left or in the center
- Background color: Choose the background color for the entire email
- Content area background color: Choose the background color for all content blocks
- Background image: Choose a background image for the entire email
- Default font: Select the default font for the email (you can add your brand colors!)
- Link color: Select the default link color (you can add your brand colors!)

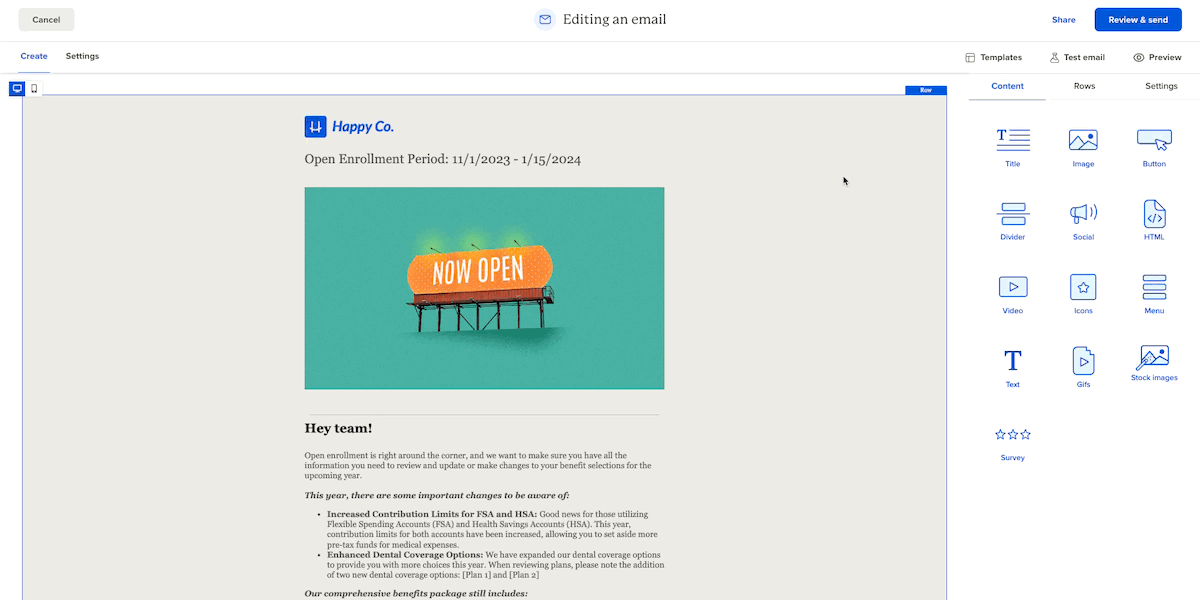
Rows: The Rows tab within email editor allows you to add and customize each row within your email. Rows are structural units that define the horizontal composition of a section of the design by using columns. A row can include one to six columns for emails.
To add a row, click and drag the type of row you would like in your email to the area of the email you want it to appear.

To customize the settings of a row, click any row within the email editor. You will then see a list of row properties that you can customize.
These include:
- Row background color: adjust the color of the entire row
- Content area background color: adjust the background color of the content background only
- Vertical align: set the alignment of your row
- Content area rounded corner: adjust the roundness of your content’s corners
- Content area border: add a border to your content and adjust the shape, size, and color of the border
- Do not stack on mobile: toggle this on or off depending on your preference
- Reverse stack on mobile: toggle this on or off depending on your preference
- Row background image: upload a background image for the selected row
- Row audience segmentation: target a specific audience for the selected row (only the list(s) you select will see the content within the row)
- Hide on: select if you want the row to be shown only on mobile or desktop
- Customize Columns: customize the background color, padding, and border of individual columns within the row. You can also add and delete columns
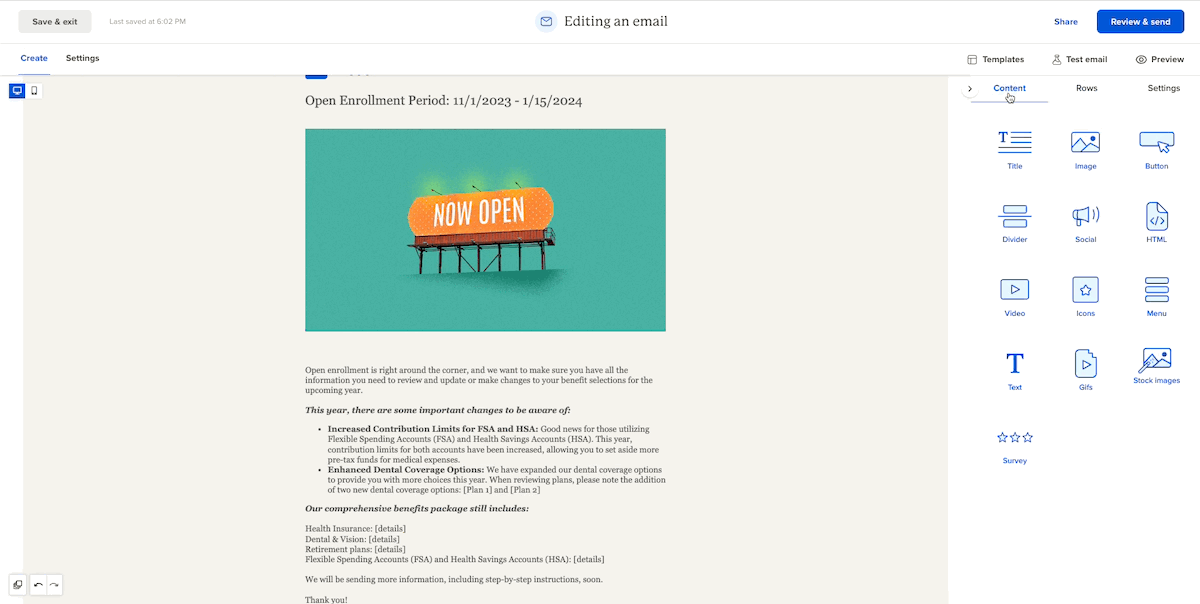
Content: In the Content section of the email editor you will see 13 content block options that you can drag into your rows to make up the layout of your email. These options include:
- Title
- Image
- Button
- Divider
- Social
- HTML
- Video
- Icons
- Menu
- Text
- Gifs
- Stock images
- Survey
To add a content block to your email, click and drag the content block of your choice to the area of the email you would like it to display. For example, if you would like to add a header section, click and drag the Title content block to the area within the email that you would like it to display.
Every content block has its own settings, such as granular control on padding. The right-side panel automatically switches to a property panel for the selected content element.
How to preview an email
To preview an email, click Preview in the upper right-hand corner of the email editor. You can then toggle between Desktop and Mobile to see how your email looks on both! Additionally, you can toggle Dark mode to preview how your email looks on a dark mode setting.
How to send a test email
To send a test email, click Test email in the upper right-hand corner of the email editor. From there, select one or more recipients to send the test email to. You can also receive the email as a specific person. This is helpful if you have utilized merge tags or audience segmentation on one or more of your rows within your email.
If you need feedback or approval on your email, you can include a note to your test email. Select the Add a note to the test email checkbox and type your note in the box. Recipients will receive the note in their inbox along with the test email.
How to send an email
Before you send your email, you will need to set your email send settings. To set your email settings, click on the Settings tab in the upper left-hand corner of the email editor. This is where you will add your email send settings, recipients, additional channel notifications, and sending options. We will go through each section a bit more in-depth!

Settings
Add your general email send settings and generate an inbox preview.
- Email name: this will be the name shown internally in your dashboard
- Subject: set your subject line that will be displayed in employees’ inboxes
- Preview text: set the preview text that will be displayed in employees’ inboxes (90 character limit)
- From name: set the name of the sender of the email. This will be displayed in employees’ inboxes. This is usually a person, department, or the organization name
- From email: set the email address of the sender. This will be displayed in employees’ inboxes
- Reply-to email: set the email where replies will be delivered. This is not enabled for everyone, but if you want replies to be directed to a different email than the from email address, we can enable this setting for you.
- Campaign name: add your email to a specific campaign. You can leave blank if you don’t have a campaign associated with the email
- Inbox preview: clicking this button will generate a preview of how the email will appear in employees’ inboxes
Recipients
Add the lists and specific people you would like to receive the email. Workshop syncs with your HRIS or Outlook so you automatically have the employee info you need. If you can’t find the list you need, contact your team member that invited you to Workshop!
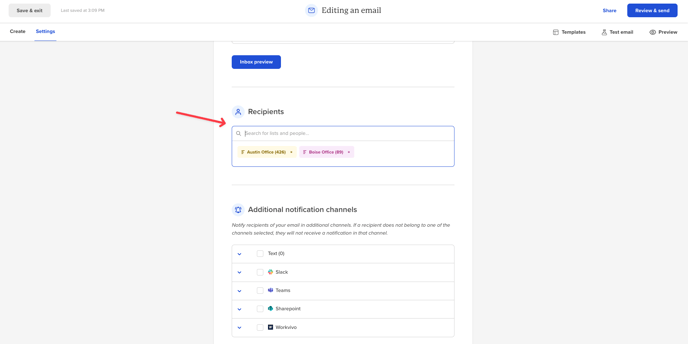
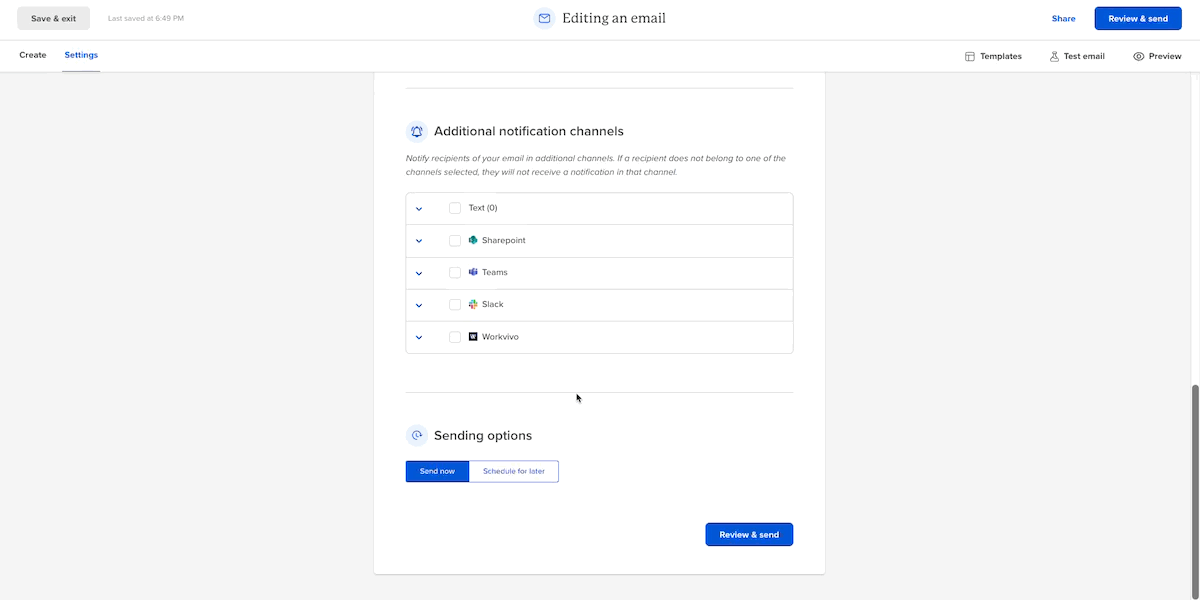
Additional notification channels
Select the additional channels you would like to cross-post the web version of this email to including SMS, Slack, Teams, Sharepoint, and Workvivo. You can also customize the preview message for each channel!
Note: If a recipient does not belong to one of the channels selected, they will not receive a notification in that channel.

Sending options
In the sending options, you can choose to send your email immediately or schedule it for a future date. By default, the setting is set to Send now. If you prefer to schedule your email, click the Schedule for later button and choose the desired date and time for sending.
How to review the analytics of an email or campaign
Once an email has been sent, you can track the analytics to see how your email is performing. You can view both individual email analytics and the analytics of an entire email campaign! We will walk you through both.
Reviewing the analytics of an individual email
To review the analytics of an individual email, navigate to the EMAIL tab and click into it. From there, find and click on the sent email you would like to review.
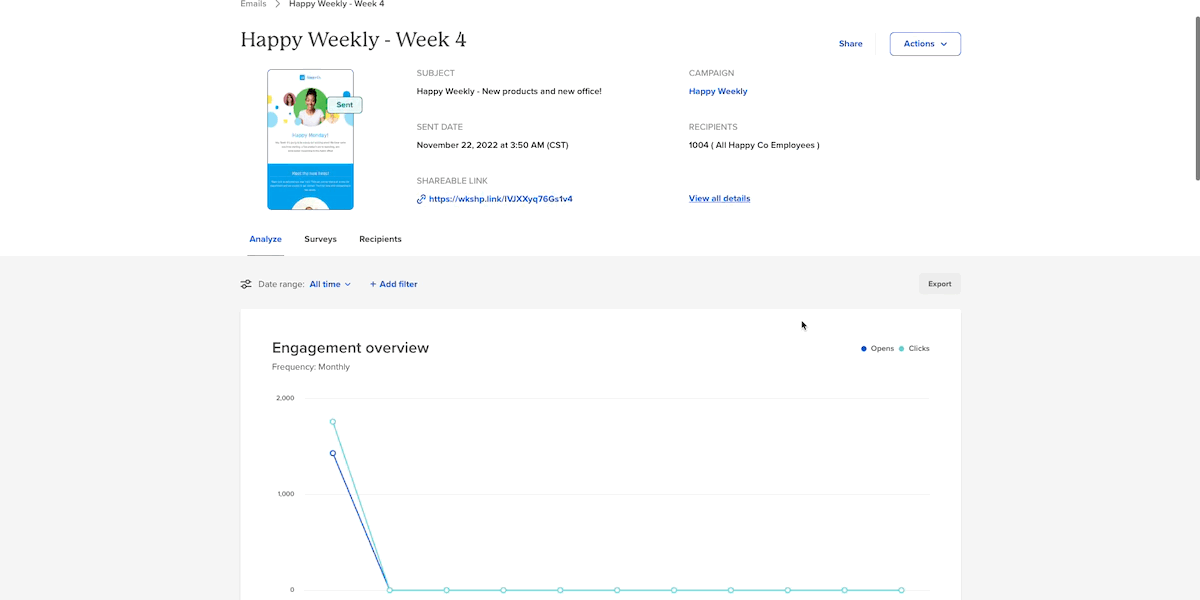
At the top of the page you will see a snapshot of your email’s details including, the subject line, sent date, a shareable link and QR code, the campaign the email is associated with (if it has one), and the recipients sent.
You can also choose to share this email with team members by clicking the Share button in the top right-hand corner, or click the Actions dropdown button to edit, clone, create a template, view, or export the email.
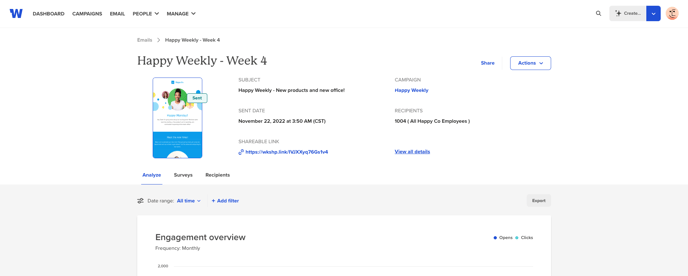
Below this information you will find three tabs: Analyze, Surveys, Recipients.
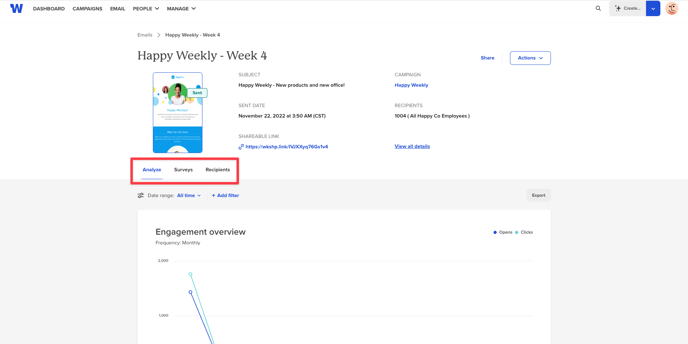
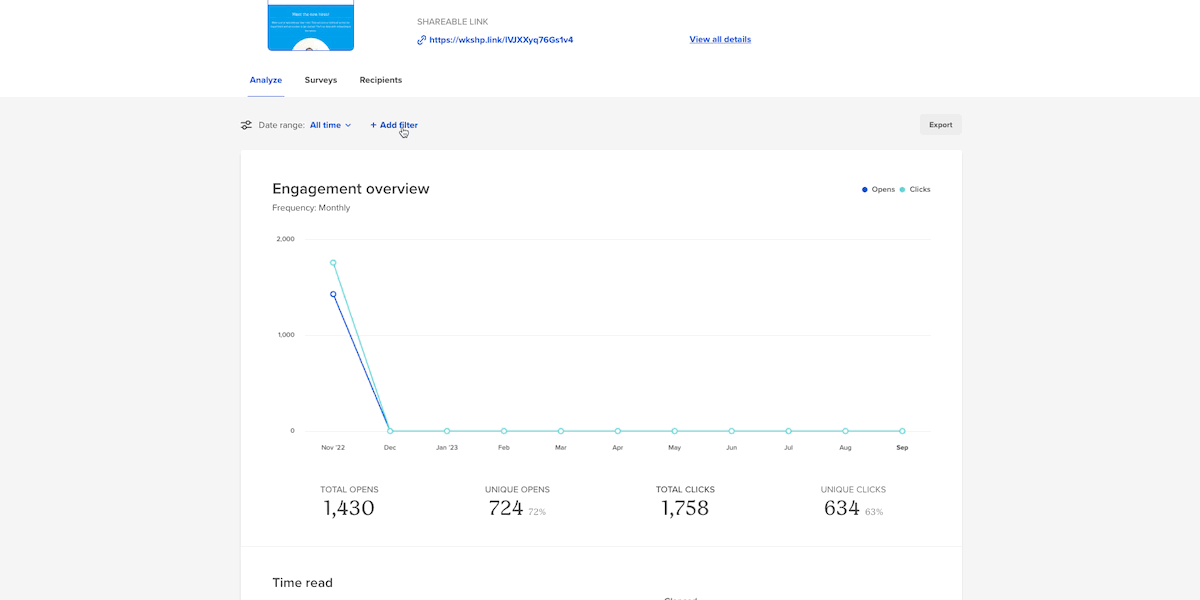
Analyze
The Analyze tab will show you all the analytics you need to see how your email is performing. You can review the email as a whole or filter the data by date range, list type, departments, and more!
- Engagement Overview: see an overview of your email’s engagement over time. You can also see the total opens, unique opens, total clicks, and unique clicks
- Time read: learn how many people read, skimmed, or glanced at your email. Workshop defines read as more than 20 seconds, skimmed as 5-20 seconds, and glanced as less than 5 seconds
- Engagement timeline: view your email’s opens and clicks over time
- Devices: see the percentage of people that read your email on desktop versus mobile
- Web visits: see the visits to your email from its shareable link
- Clicks: view the unique and total clicks for the links you included in your email
To filter your email by date, list type, departments, and more, click Add filter in the top left-hand corner of the Analyze tab and choose the data you would like to review. Then click the Save button. You can also review a certain time period by selecting a date range. Filtering is helpful if you want to see how a specific department or list is engaging with your email.
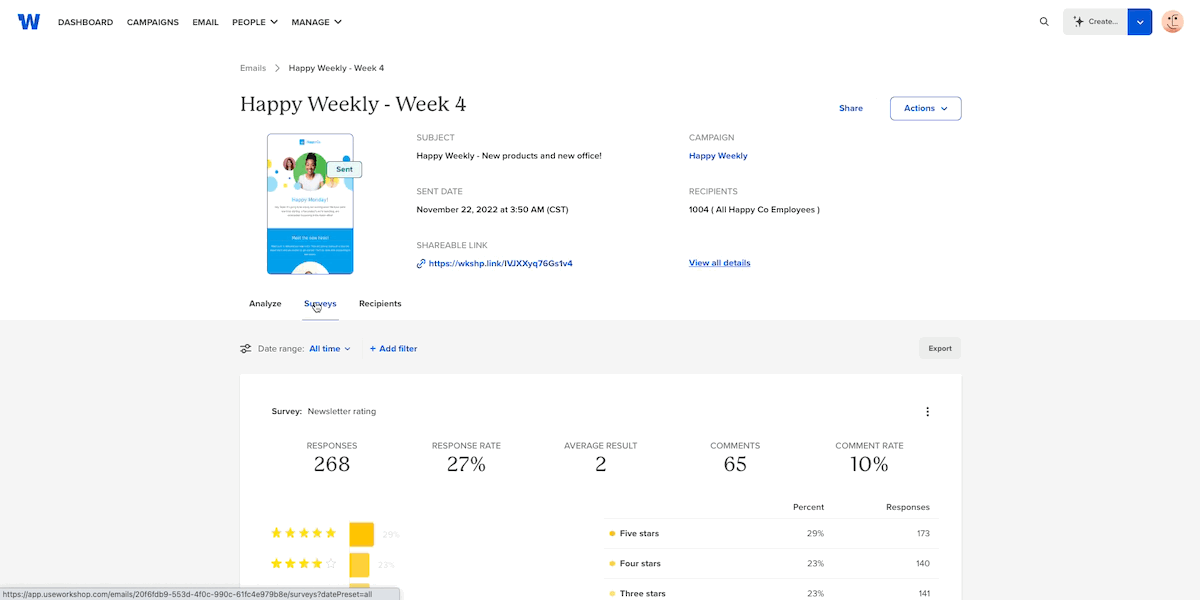
Surveys
The Surveys tab will show you the data associated with any survey you included in your email. You can review the over response rate in addition to individual comments.
Your survey results will display based on your choices when you built it. If you created an anonymous survey, no names will be visible from the results tab.
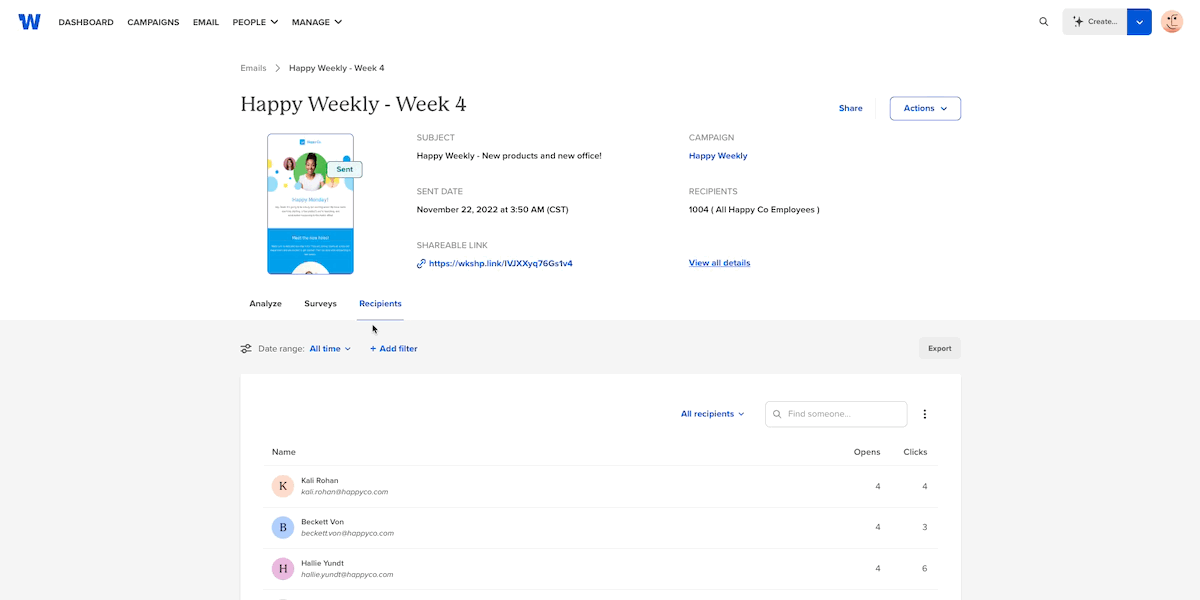
Recipients
The Recipients tab will show you a breakdown of everyone who received your email in addition to the opens and clicks for each recipient.
To filter your recipients by date, list type, departments, and more, click Add filter in the top left-hand corner of the Recipients tab and choose the data you would like to review. Then click the Save button. You can also review a certain time period by selecting a date range.
Reviewing the analytics of an email campaign
To review the analytics of an email campaign, navigate to the CAMPAIGNS tab and click into it. From there, select the campaign you would like to analyze.
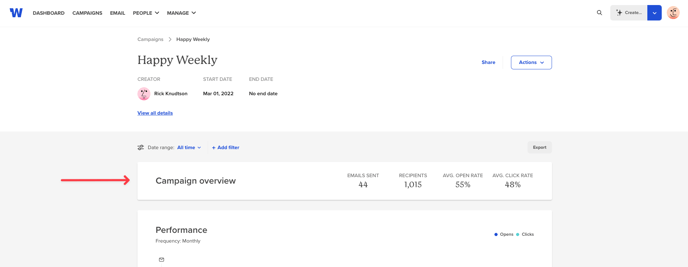
Here you will see an overview of the campaign like the creator, start date, and end date. You can also choose to share this campaign with team members by clicking the Share button in the top right-hand corner, or click the Actions dropdown button to edit campaign details, create an email within the campaign, delete the campaign, or export the campaign’s data.
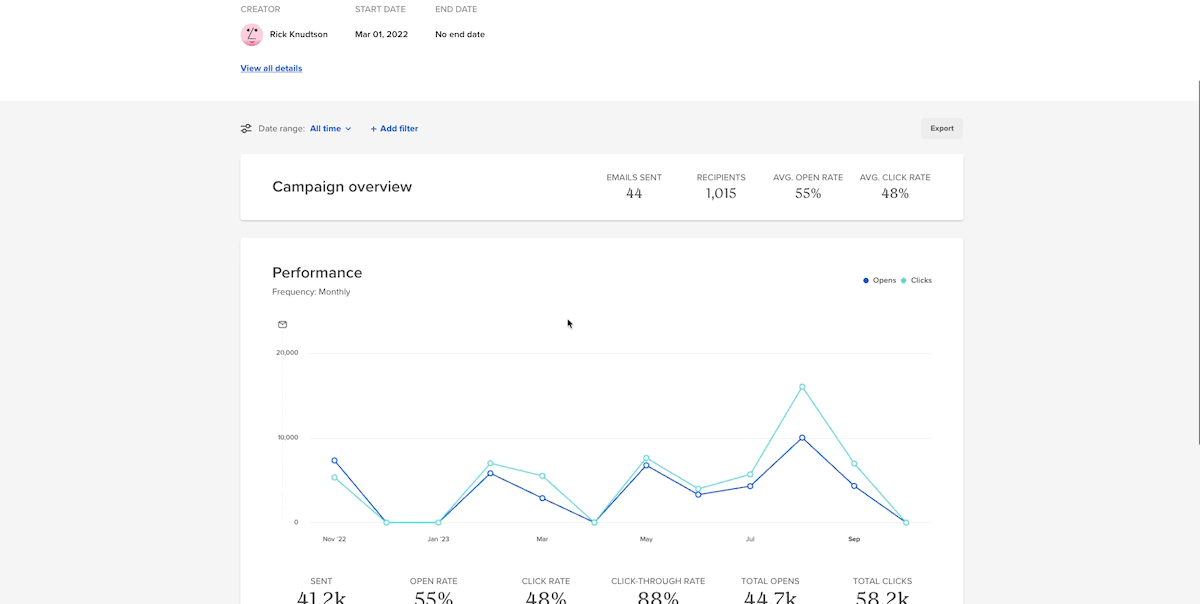
Below the campaign details you will see a campaign overview with the total emails sent, recipients, average open rate, and average click rate.
Next, you will find a performance chart of your campaign. Here you can review the total number of recipients, the open rate, click rate, click-through rate, total opens, and total clicks.

You will then find a breakdown of all individual emails within the campaign. You can see the email name, number of recipients the email was sent to, unique opens and clicks, and the status of the email. Additionally, you can click into any individual email from this view.

Lastly, you can review an in-depth look at the recipients within the campaign. You can view their overall engagement, events, opens, and clicks. If you would like to see the engagement of a particular team member, you can search for their name or email address in the search bar in the top right-hand corner.

Filtering Campaign data
To filter your campaign by date, list type, departments, and more, click Add filter in the top left-hand corner and choose the data you would like to review. Then click the Save button. You can also review a certain time period by selecting a date range. Filtering is helpful if you want to see how a specific department or list is engaging with your campaign.
If you have any additional questions, get in touch with your Account Manager!